
Using Microsoft Forms, you can create inviting surveys, quizzes, and polls that are accessible from nearly any device, and then view the results in real-time. There are analytical tools to summarize the information gathered from the form and that optionally export these results to Excel for use with other analytical tools.
Forms are used to gather feedback, conduct surveys, conduct polls, and much more. These forms can be created in OneDrive, as Web-based, inside an Excel workbook, within a OneNote notebook, and as a tab in a channel in Microsoft Teams. It’s extremely easy to create and deploy a form with just a few mouse clicks using an out-of-box template from Microsoft.
If you want a custom form, you’ll need a few additional mouse clicks. The decision of what kind of form to create is driven by the type of information you’re trying to gather from the participants. Knowing what kinds of results you want helps you decide if you’re going to create a new form (poll or survey) or a new quiz.
To help you get familiar with the steps necessary and see how easy it is to do, let’s go through the basic steps used to create a web-based survey.
- After logging into Microsoft 365, click the Forms option located on the waffle in the top left-hand corner of M365.
- Click on +New Form.
- Type in the title of form, a description(optional), and place an image representing the topic of the form.
- Type in the survey question for the participants.
- Choose the type of responses associated with the question. The main options are Choice, Text, Rating, or Date. Other options include Ranking, Likert, Upload File, or Net Promoter Score.
Note: You can format your text using keyboard shortcuts, such as bold, italic, underline, and font settings, and you can add an image to each possible response to the question if using the Choice option.
- Optionally, you can specify whether the question is required, if you want to allow multiple answers for the question while controlling how many choices they can select, and if you want to allow participants to add their own answer that is not an already listed choice to the question.
- Add more questions to the form using steps 4 – 6.
Note: If you are going to include several questions, you can categorize them using sections.
- Optionally, you can customize the look and feel of the form using the Style option that includes background themes, colors, and even a selection of background music.
- Click Preview to see what your survey looks like when the user views it on a computer and then click Mobile to see how it will be displayed on a mobile device.
- Use the Collect responses button to specify the following configuration settings:
- Specify who can respond, whether you want to document their names, and whether to limit each participant to one response.
- Create a shortened URL and/or copy the link to the survey.
- Send an invitation to survey participants using Outlook or Microsoft Teams.
- Download the QR code so participants can scan the code to access the survey.
- Copy the code that was generated so it can be pasted on a webpage.
- By clicking the ellipsis (top right-hand side of the page), you can complete the following steps:
- Collaborate or Duplicate: Add collaborators or share as a template
- Settings: Identify participants who can access the survey, configure response options including start/end date of survey, shuffle questions of survey, create a custom thank you message, and configure response receipts.
- Multilingual: Displays the survey in multiple languages.
- Print Form: Prints the survey you’ve created.
- Feedback: Provides your thoughts to Microsoft regarding what you like, dislike, or you can make a suggestion to Microsoft for a potential improvement to Forms.
- To view the survey results, you can click the Responses option (top left of page) to see:
- Responses (overview)
- Average time to complete survey
- Status of survey
- Individual responses
- Responses in Excel
Figure 1 is an example of a one question survey that I created in less than five minutes using Forms. It requires an answer, allows you to select multiple choices up to three, and allows you to add your own choice to the question.
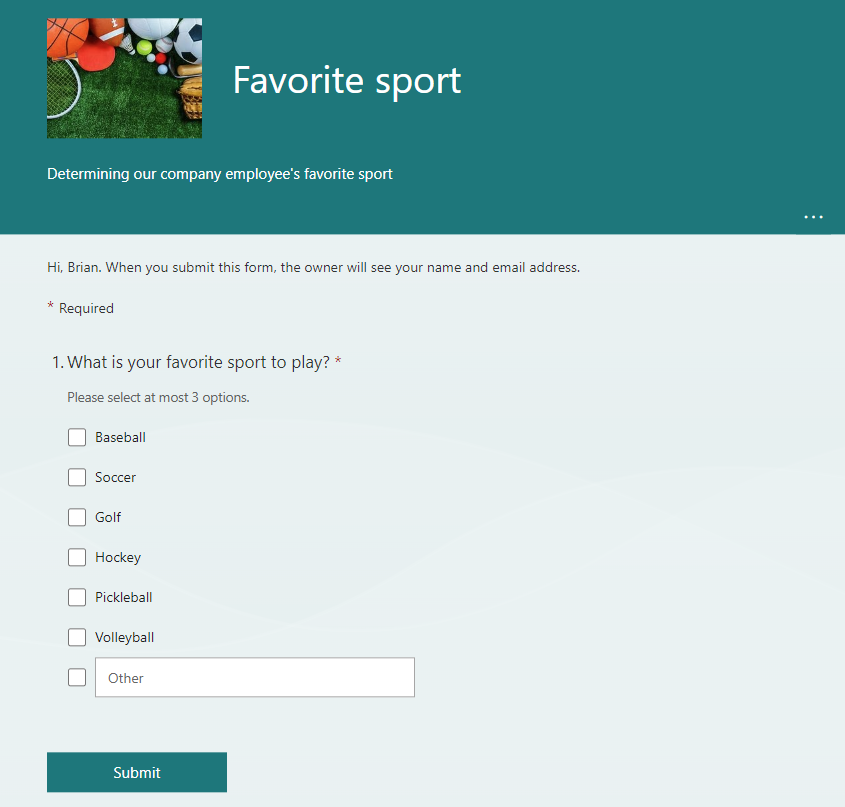
Tip: When viewing forms and quizzes in your Microsoft 365 account, it may be challenging to differentiate between forms and quizzes. When creating them, use a prefix to help you identify the type of form that was created. For instance: Quiz-FavoriteSportResults, or Survey-FavoriteSport.
The Forms tool provides an efficient way to easily gather data from your team and view the results from these polls or surveys quickly The integration of Forms with Microsoft Teams is very powerful and can be used to obtain real-time results from participants, which can be helpful during project planning sessions, when needing feedback on a specific topic, when performing brainstorming exercises, or deciding where the holiday party should be held.