![]()

The powerful collaboration tool SharePoint Online (SPO) is deeply integrated with Microsoft Teams and OneDrive. A SharePoint administrator needs to carefully automate, bulk manage, and configure these sites, users, and groups because it’s possible that tens of thousands of SharePoint sites each have thousands of users accessing them. Most of those users are managed using groups. To perform some of the more common SPO administrative tasks, you need a thorough understanding of how PowerShell integrates with SPO and how to use PowerShell to manage sites, users, and groups and how to generate PowerShell scripts.
PowerShell for SharePoint Online has several cmdlets for managing all aspects of SharePoint Online. The SPO PowerShell module offers three primary management activities:
- Create SPO sites and configure the settings of these sites.
- Manage SPO users and groups.
- View SPO site group membership.
Note: You need to be a member of either the SharePoint Admins role or the global administrator role in Microsoft 365 in order to connect and manage SharePoint Online.
Installing SharePoint Online PowerShell
Before you can begin using PowerShell SPO cmdlets, you have to install them. There are a couple of ways to complete this installation:
- Install the SPO PowerShell module via PowerShell Gallery.
- Install the SPO PowerShell module manually by downloading and installing the .msi file.
This article explores the installation via PowerShell Gallery. In this PowerShell Window, you perform three actions including: checking to see if the SPO PowerShell module is already installed, installing the SPO PowerShell module, and updating the SPO PowerShell module to ensure that you have all the latest and greatest SPO cmdlets.
To perform these tasks, use the following steps:
- Open Windows PowerShell in Administrator mode.
- Issue the Get-Module cmdlet specifying the SPO module name.
- If PowerShell for SPO is not installed, issue the Install-Module cmdlet to install it.
- Ensure that the latest cmdlets are available by issuing the Update-Module cmdlet specifying the SPO module.
Figure 1 shows these cmdlets being used to perform these actions.

Note: Alternatively, you can install the SharePoint Online Management Shell module by downloading and installing a .msi file that is located on this Microsoft site.
Connecting to SharePoint Online Using PowerShell
You next want to connect to and verify that you’re connected to SPO using PowerShell so you can begin managing and configuring SPO using PowerShell. Begin by using the Connect-SPOService cmdlet that pops up a window asking you to supply the credentials needed to complete the connection to SPO.
After a successful connection is established, issue the Get-SpoSite cmdlet to verify that the connection was successful and also display a list of site collections in SharePoint Online, as shown in Figure 2.

Important: When connecting to SPO, you need to specify the URL of your tenant name. This URL requires that you append -admin after your tenant name. Notice that when I connected to SPO in the Microtechpoint tenant in Figure 1, I used https://microtechpoint-admin.sharepoint.com. It’s the only service that requires -admin in the URL when you connect to it.
Understanding SharePoint Online cmdlets
There’s a plethora of SPO PowerShell cmdlets, so I’m not going to discuss all of them. I’ll explore the most common cmdlets used to manage your SPO sites, users, and groups. The general cmdlets for managing these SPO components involve using five primary commands with a verb-noun pattern. There will be some examples following this overview.
- Add-xxx: Adds a SharePoint component
- Get-xxx: Retrieves and displays information about a SPO component
- New-xxx: Creates a new SPO component
- Set-xxx: Modifies or changes settings on a SPO component
- Remove-xxx: Deletes a SPO component
Common SharePoint Online cmdlets
The following are the cmdlets you’ll use most often.
Obtaining Help with Available SharePoint Online PowerShell cmdlets
There are just too many SPO PowerShell cmdlets for anyone to remember all of them, but you can get help on all the SPO PowerShell cmdlets by using the following command:
Use the following command to display a list of SPO PowerShell cmdlets that begin with a verb, like Add:
Use the following command to display the details of a specific SPO PowerShell cmdlet:
Use the following command to see examples of a specific SPO PowerShell cmdlet:
Managing SPO Components in Bulk
If you have the need to create site collections or add users in bulk, you can create a .csv file containing the necessary fields, separated by commas, for the SPO object and then use SPO PowerShell to perform a bulk import. For instance, if you wanted to create several site collections, you can create a .csv file, called NewSiteCollections.csv, using a format similar to this:
In subsequent lines, provide the values for each site collection you want to create:
To create the new site collections, open SPO PowerShell in Administrator mode and execute the following command:
To add users to the new site collections, create two additional .csv files. Call the first file GroupsPermissions.csv. It will store the groups and permissions by using a format similar to:
In subsequent lines, provide the values for each group and its permission level that you want to create:
The second file, which you can call users.csv, stores the users you’re adding to the site collection using a format similar to:
In subsequent lines, provide the values for each user that you want to add to the site collection:
To add the groups to the new site collections, open SPO PowerShell in Administrator mode and execute the following command:
After the previous command completes successfully, add the users to the site collections by opening SPO PowerShell in Administrator mode and executing the following command:
Alternatively, you can create a PowerShell script to execute the two previous commands from within the script file. Do so by creating a file called GroupsUsers.ps1, and copying and pasting the two Import-CSV commands into the file on separate lines, in the same order you ran them individually.
You can execute the script file by opening SPO PowerShell in Administrator mode and executing the following command:
Using SharePoint Online PowerShell cmdlets
Figure 3 contains the commands used to create and manage a new SPO site by using the following steps:
- Using New-SPOSite, create a new SPO site called “MTP Sports” using the following parameters:
- Classic team site template, using template STS#0
- Assign site Title of “MTP Sports Info”
- Assign StorageQuota of 1024 MBs
- Set Brian as the site collection Owner
- Run Get–SPOSite to display settings of the new site just created.
- Use Set-SPOSite to modify the site StorageQuota by doubling the initial storage quota to 2048.
- Run Get-SPOSite to display new storage quota settings.
- Use Add_SPOUser to add Linda as a new user in the “MTP Sports Info Members” Group.
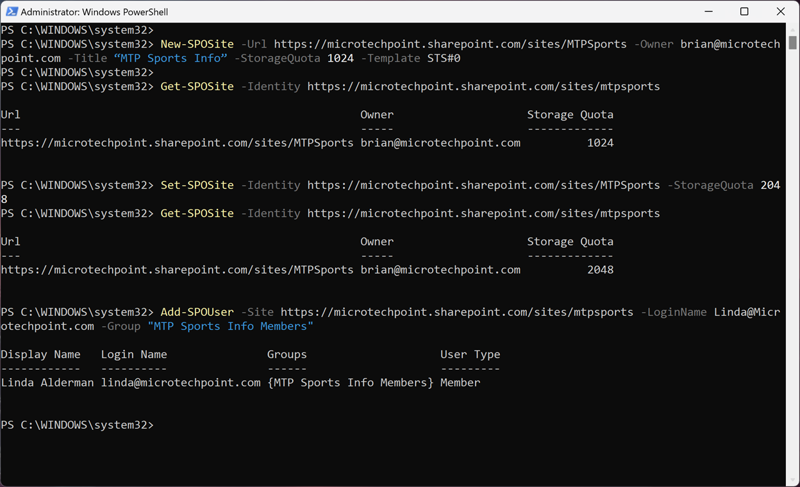
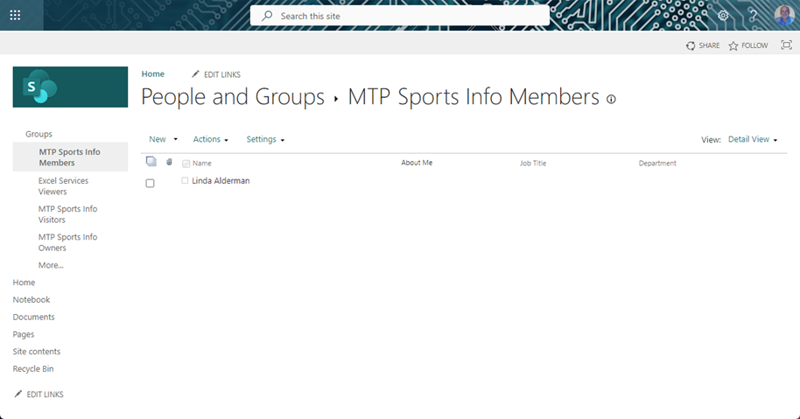
Figure 4 is a screen shot of the new SPO site showing the title of the site you added, and that Linda is a member of the default “MTP Sport Info Members” group located within the site.
As I mentioned previously, there are too many SharePoint Online PowerShell cmdlets to discuss here, but you can review and learn about all of them here: Microsoft.Online.SharePoint.PowerShell.
SharePoint Online and PowerShell could certainly change, so you should monitor this site for changes: Microsoft 365 Roadmap.